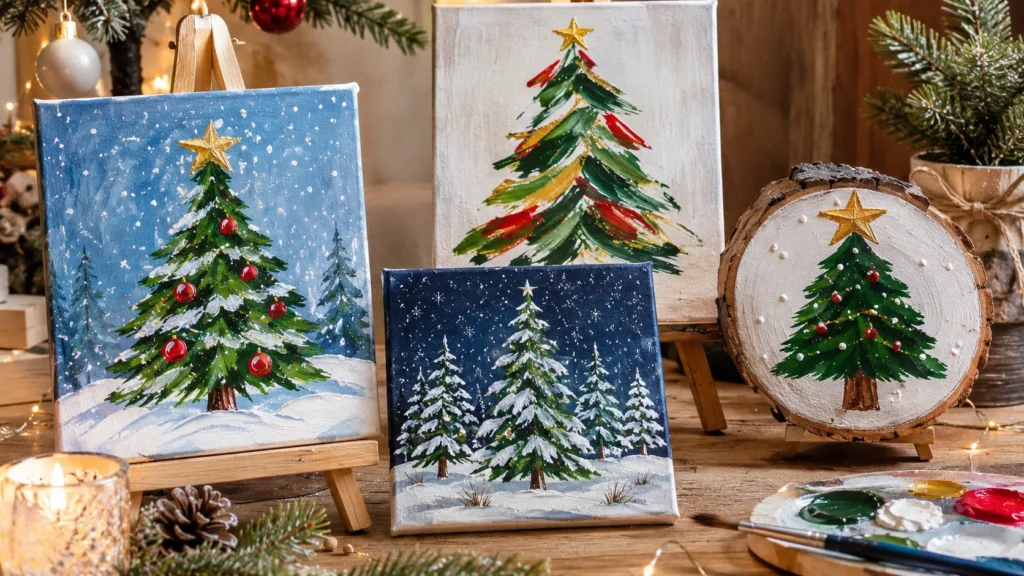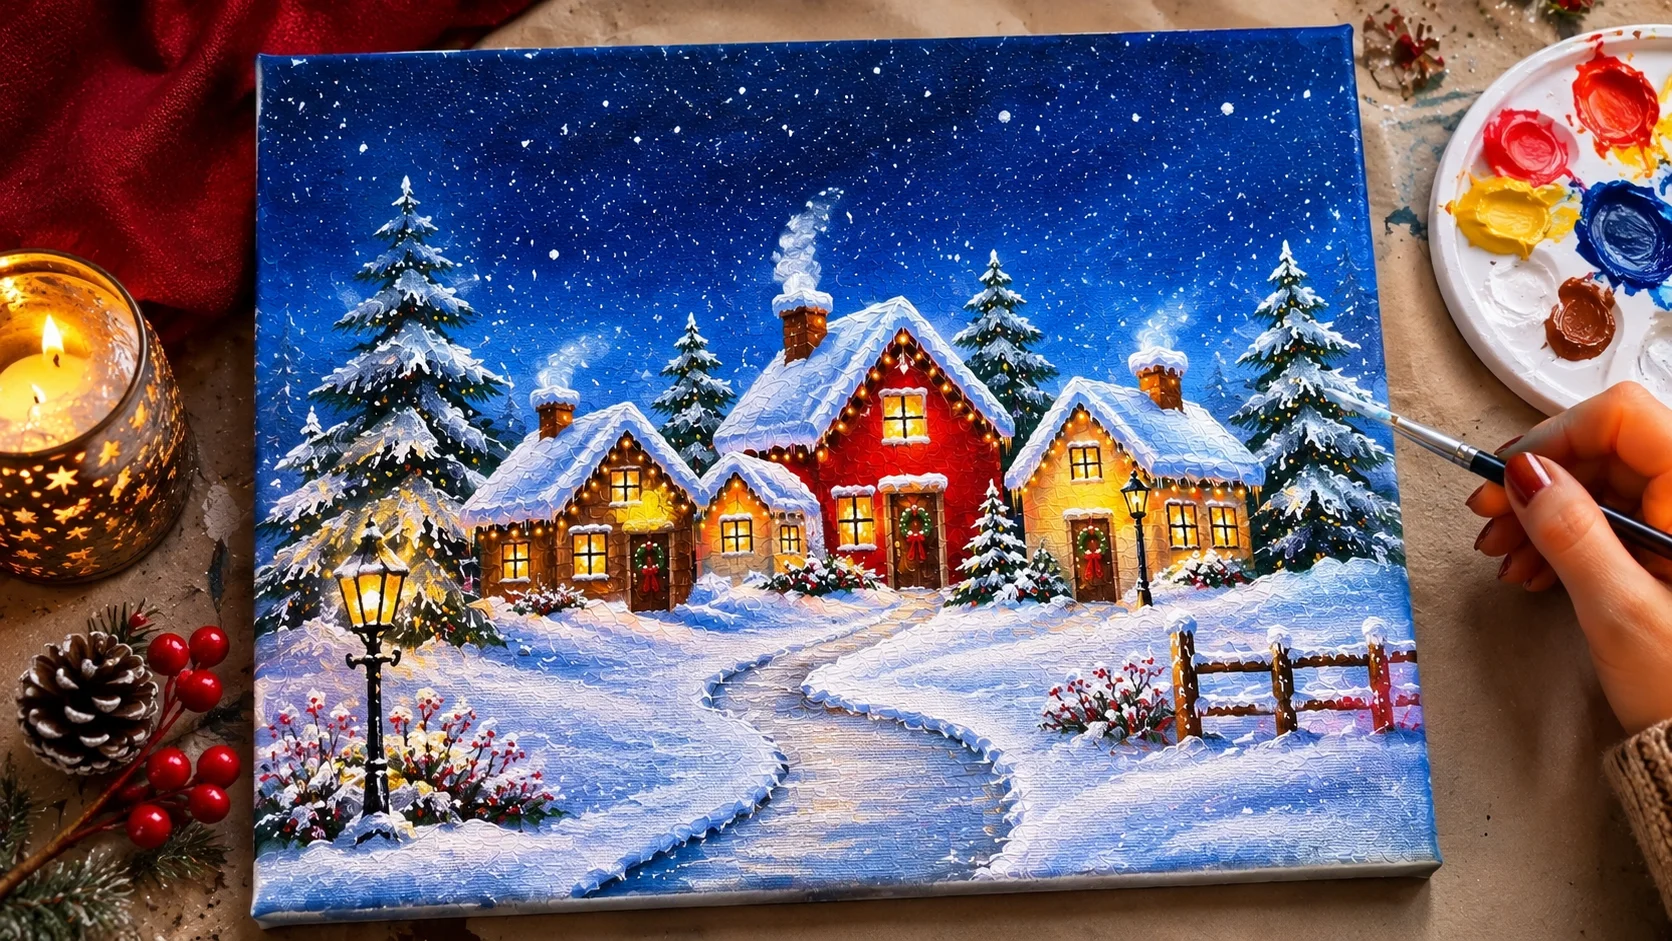
A snowy Christmas village painting on canvas is a beautiful way to bring a little winter magic into your holiday decorations. With colorful cottages, snow-covered rooftops, glowing windows, and tiny evergreen trees, you can create a charming winter scene using simple acrylic painting techniques. Even if you’re new to painting, this beginner-friendly tutorial will help you build the entire village one layer at a time. If you enjoy seasonal canvas projects, explore these easy Christmas tree painting ideas for beginners for more festive inspiration.
For this project, we’ll create a cozy Christmas village at dusk, with a deep blue winter sky, warm cottage lights, snowy paths, and frosted pine trees. You don’t need advanced drawing skills or complicated brush techniques to achieve a lovely result. If you’re new to this medium, check out this helpful introduction to acrylic painting by Winsor & Newton to learn more about acrylic paints, brushes, surfaces, and basic techniques.
What You’ll Need to Paint a Snowy Christmas Village
Acrylic paint is a great choice for this project because it dries relatively quickly, allowing you to build the village in layers. A pre-primed canvas, a few basic brushes, and a small selection of colors are enough to get started.
Painting Materials
- One 11 x 14-inch stretched canvas, preferably pre-primed.
- Acrylic paints: titanium white, ultramarine blue, cerulean blue, burnt sienna, raw umber, cadmium red, yellow ochre, and dark green.
- One 3/4-inch flat brush for backgrounds and large areas.
- One medium round brush (size 4 or 6) for houses and trees.
- One small round detail brush (size 0 or 1) for windows, doors, and rooftops.
- One fan brush for evergreen tree textures (optional).
- A palette or mixing surface.
- A cup of clean water.
- Paper towels or a clean painting cloth.
- A pencil and eraser for the initial sketch.
Suggested Christmas Village Color Palette
- Winter sky: Ultramarine blue, cerulean blue, and titanium white.
- Snow: Titanium white with small touches of blue and gray.
- Christmas cottages: Burnt sienna, yellow ochre, cadmium red, and raw umber.
- Evergreen trees: Dark green mixed with ultramarine blue.
- Glowing windows: Yellow ochre, cadmium yellow, and a little white.
- Shadows: Ultramarine blue mixed with a small amount of burnt umber.
Keep titanium white separate on your palette. You’ll use plenty of it for snowy roofs, frosted trees, falling snow, and highlights.
How to Paint a Snowy Christmas Village on Canvas
Follow these eight steps to create a festive winter village. Work from the background toward the foreground, allowing the larger painted areas to dry before adding smaller details.
Step 1: Prepare the Canvas and Paint the Winter Sky
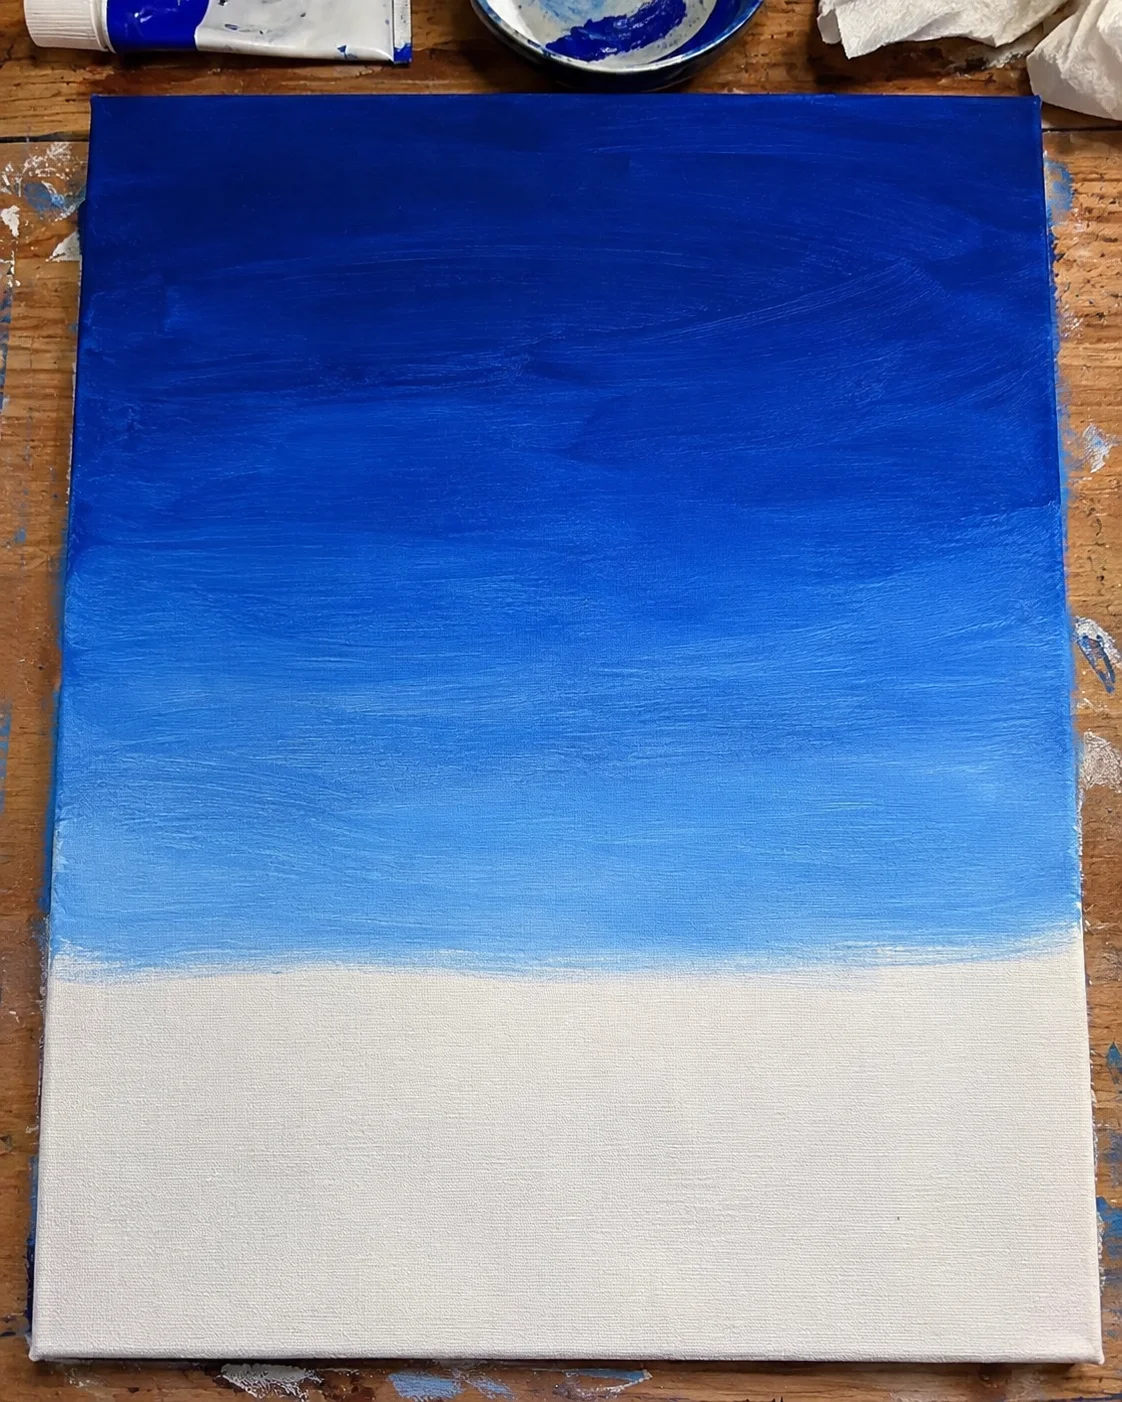
Start with a clean, pre-primed canvas. If you’re using raw canvas, prepare it with an appropriate acrylic gesso and allow it to dry according to the manufacturer’s instructions.
Mix ultramarine blue with a little cerulean blue and white to create a medium winter blue. Using your large flat brush, cover the upper two-thirds of the canvas with this color.
For a beautiful evening atmosphere, make the top of the sky darker and gradually blend toward a lighter blue near the horizon. Add a little white to soften the transition.
Leave the lower portion of the canvas for the village and snowy foreground. Let the background dry before moving on.
Step 2: Sketch the Christmas Village Layout
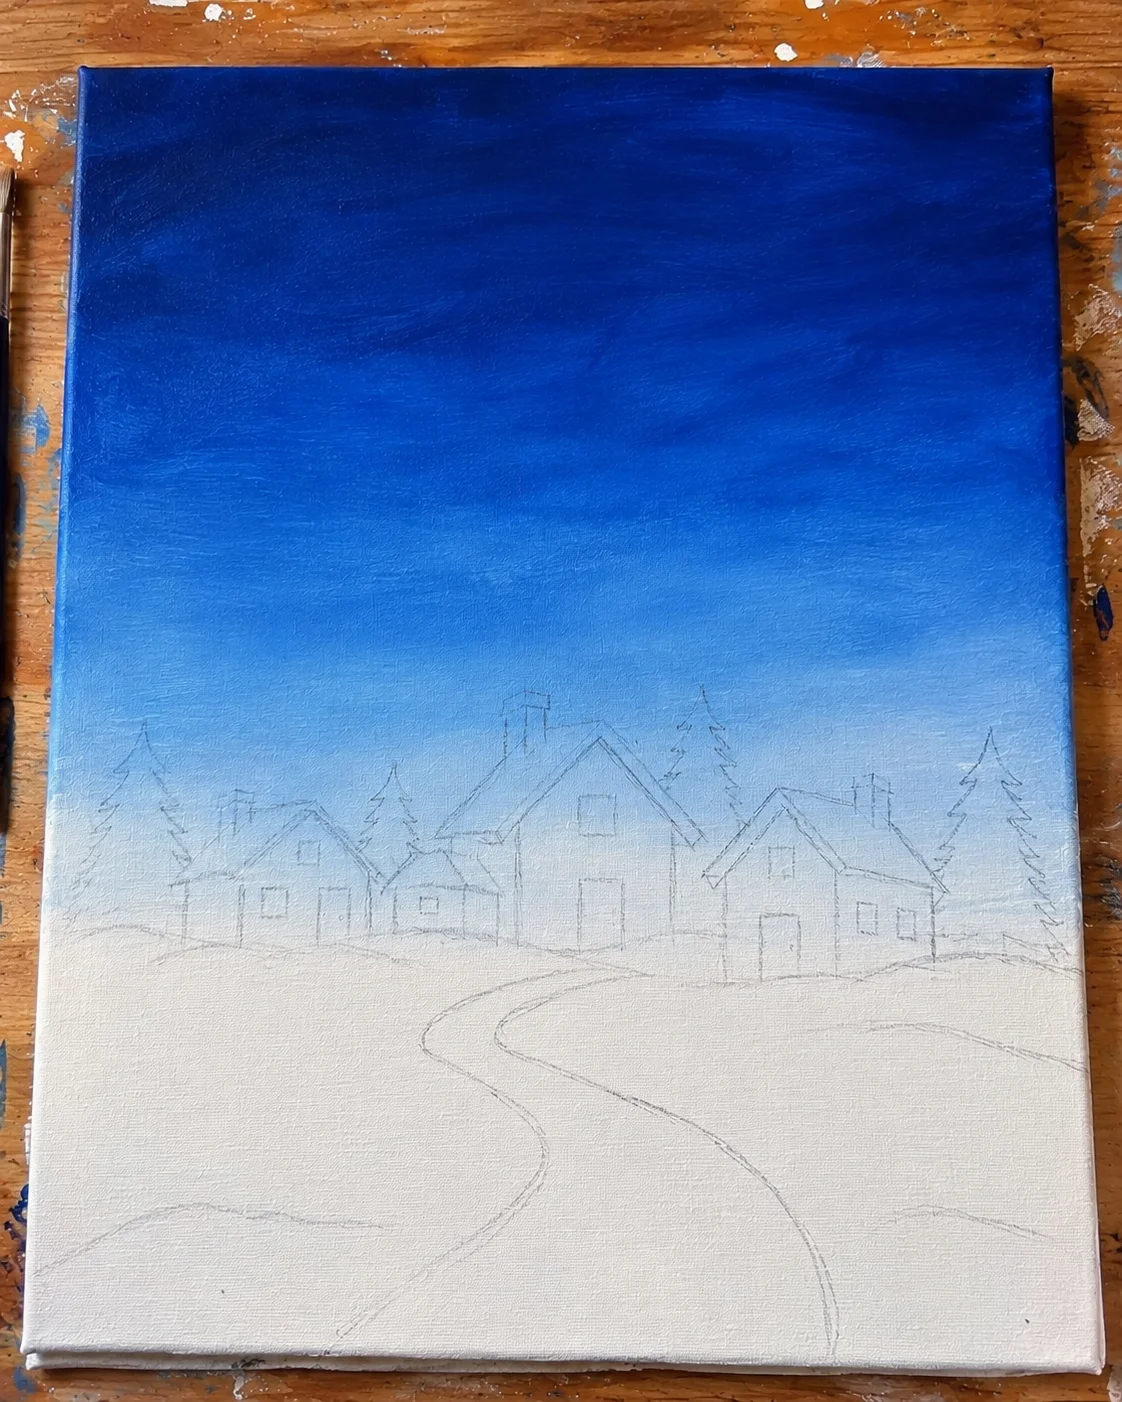
Use a pencil to lightly outline three to five small houses across the middle of the canvas. Arrange them at slightly different heights and widths to make the village look natural rather than perfectly symmetrical.
Give each cottage a simple rectangular body and a triangular or sloping roof. Place one larger house near the center and smaller cottages on either side.
Sketch a winding snowy path starting near the village and extending toward the bottom of the canvas. Leave some open spaces for pine trees, snowbanks, and small decorative details.
Keep the pencil lines light so they won’t show through the finished painting.
Step 3: Paint the Colorful Christmas Cottages
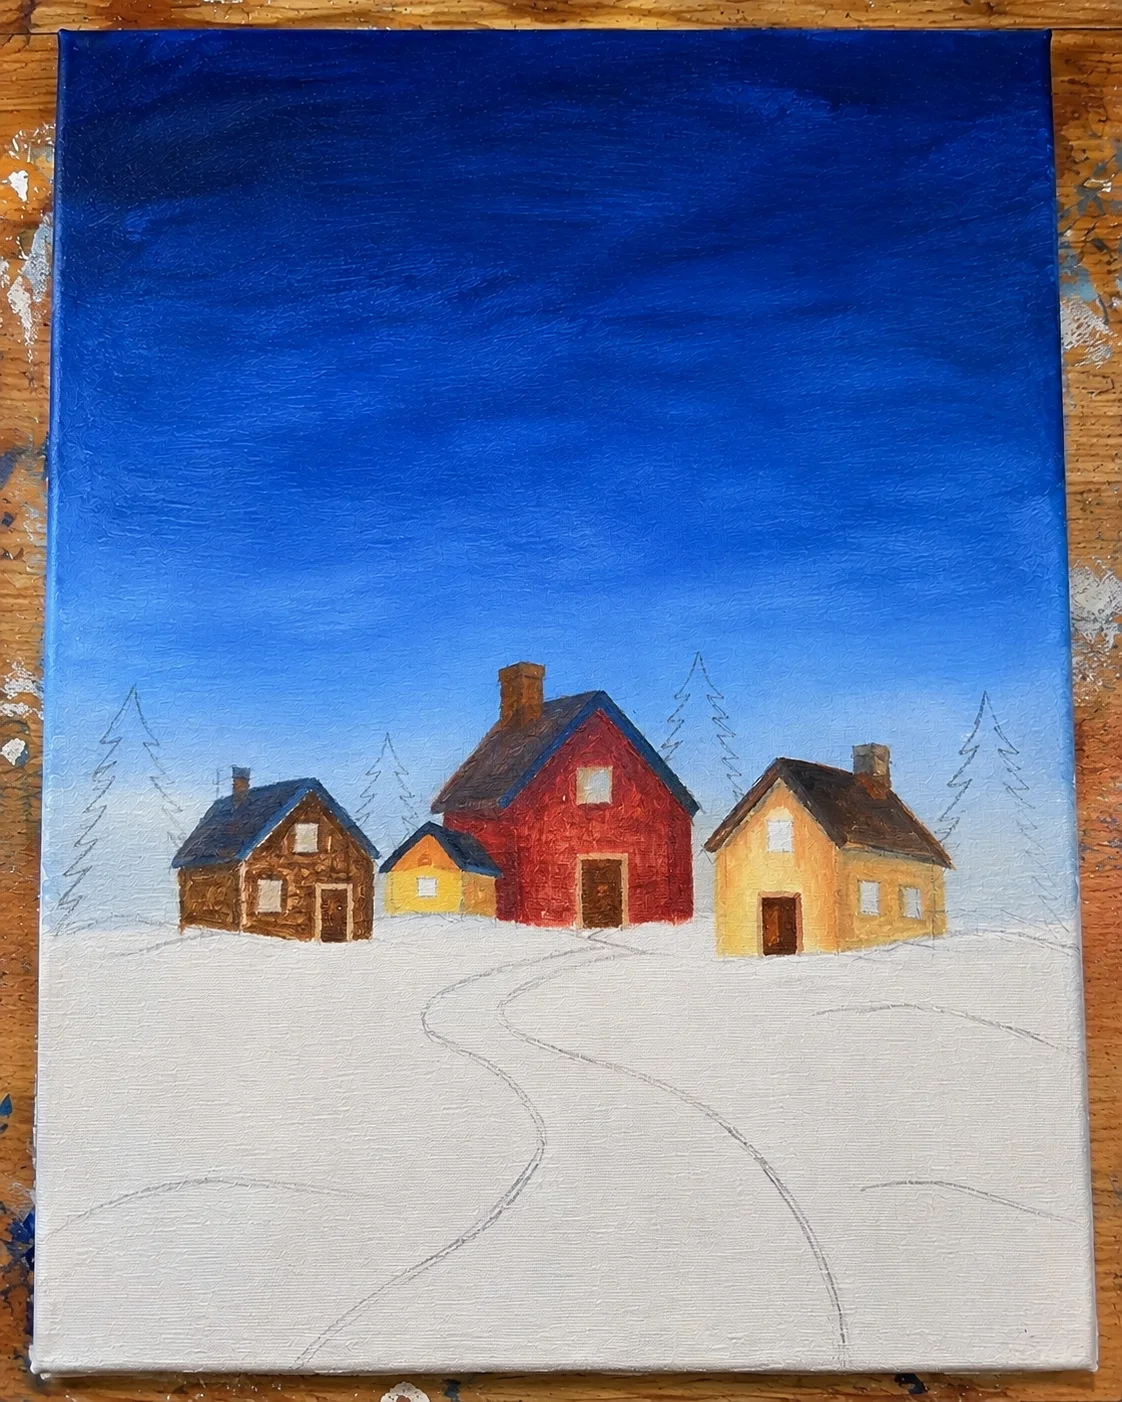
Choose different warm colors for each house. Use burnt sienna and white for a soft brown cottage, red and white for a traditional Christmas house, and yellow ochre mixed with white for a golden farmhouse.
Fill in the walls with your medium round brush. Use a slightly darker shade along one side of each building to suggest shadows and give the cottages more dimension.
Next, paint the triangular rooftops using dark brown, deep blue, or a muted red. Don’t worry about making every roof perfectly straight. Small variations help create a charming storybook appearance.
Leave the roof edges visible because you’ll add thick-looking snow highlights in a later step.
Step 4: Add Snow-Covered Rooftops
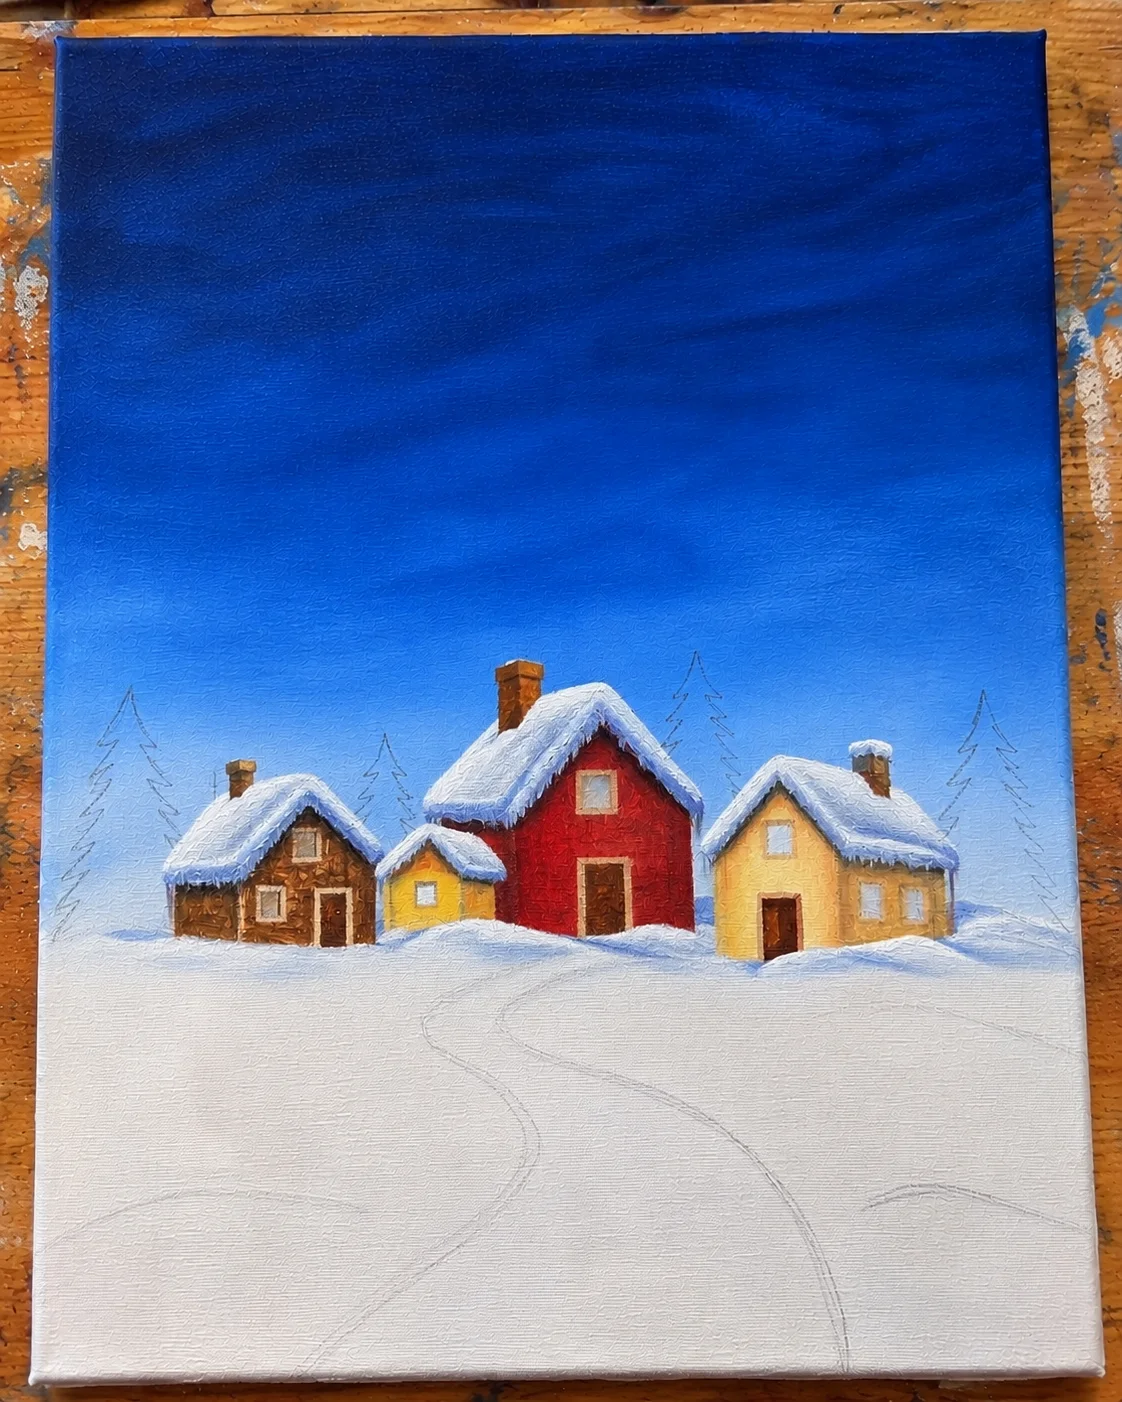
Once the cottage shapes are dry, it’s time to add the snow. Mix titanium white with a tiny amount of ultramarine blue to create a cool snowy shade.
Use a small flat brush to paint snow along the upper edges of the rooftops. Follow the angle of each roof, allowing the white paint to form slightly uneven edges.
Add a thicker white section near the top of each roof and a few small blue-gray strokes underneath. These subtle shadows help the snow appear dimensional instead of looking like a flat white stripe.
You can also add little snow piles on windowsills, fences, and the ground surrounding the cottages.
Step 5: Paint the Evergreen Christmas Trees
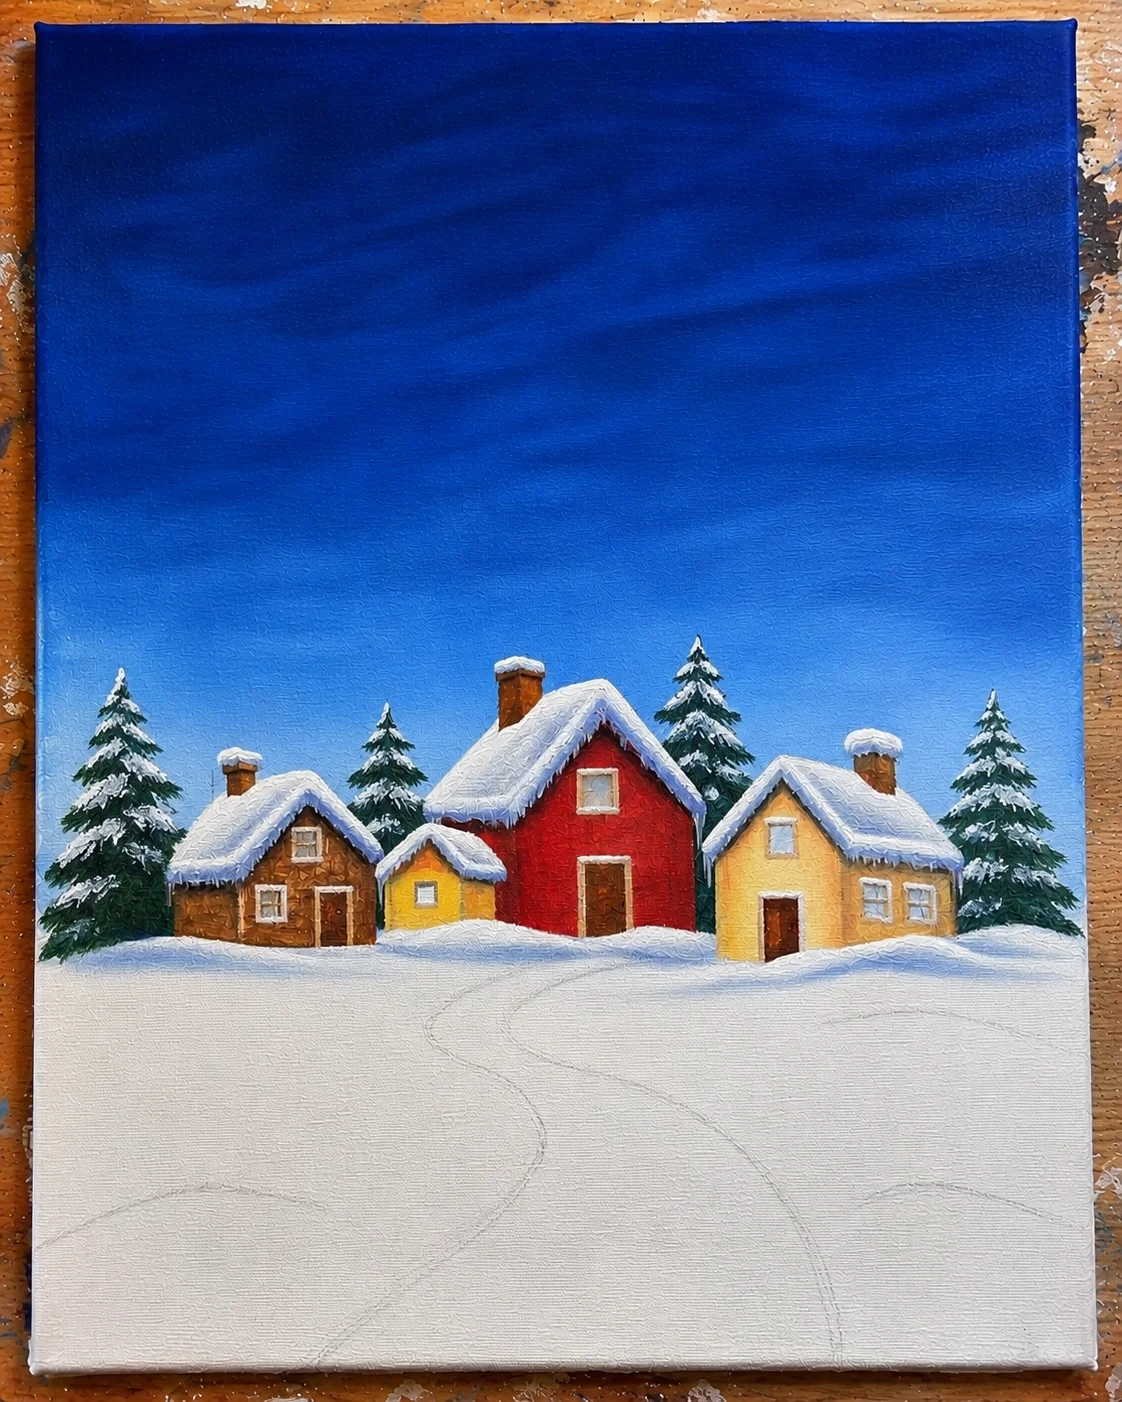
Dark evergreen trees create a beautiful contrast against the snowy village. Mix dark green with a little ultramarine blue to make a deep forest color.
Start with a thin vertical line for the trunk. Then use a small round brush or fan brush to create short, uneven strokes extending outward from the center.
Begin with wider branches at the bottom and gradually make them shorter toward the top. This creates the familiar triangular shape of a Christmas tree.
Paint several trees around the cottages, varying their heights and sizes. Once the green paint is dry, add small touches of titanium white along the branches to create snowy highlights.
For a festive touch, add tiny red and yellow dots to one or two trees to suggest Christmas decorations.
Step 6: Add Glowing Windows and Christmas Details
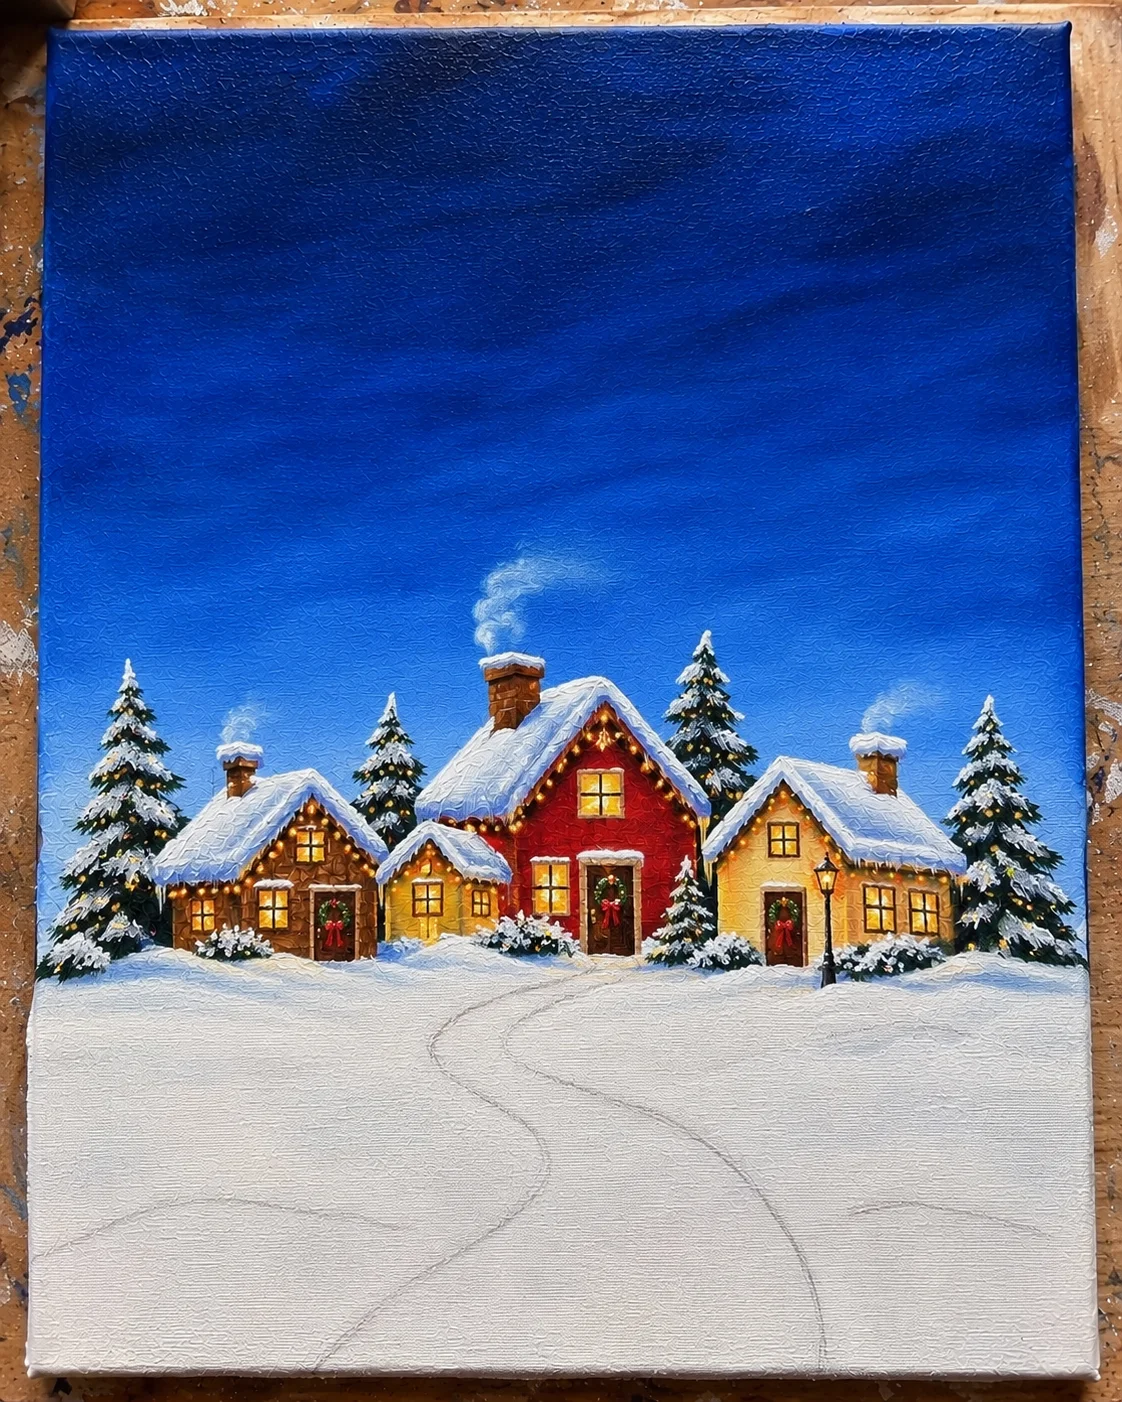
The glowing windows are one of the most charming parts of a snowy Christmas village painting. They create a warm contrast against the cool winter colors.
Use your smallest detail brush to paint small rectangular windows with yellow ochre or golden yellow. Add a little lighter yellow or white near the center of each window to suggest warm indoor light.
Paint dark brown or deep blue window frames around the yellow shapes. Add simple doors, chimneys, and a few narrow lines to suggest wooden details.
You can also paint a tiny wreath on a cottage door, a red ribbon, or a small Christmas tree beside the entrance. Keep these decorations simple because the houses are relatively small.
Step 7: Create the Snowy Ground and Winding Path
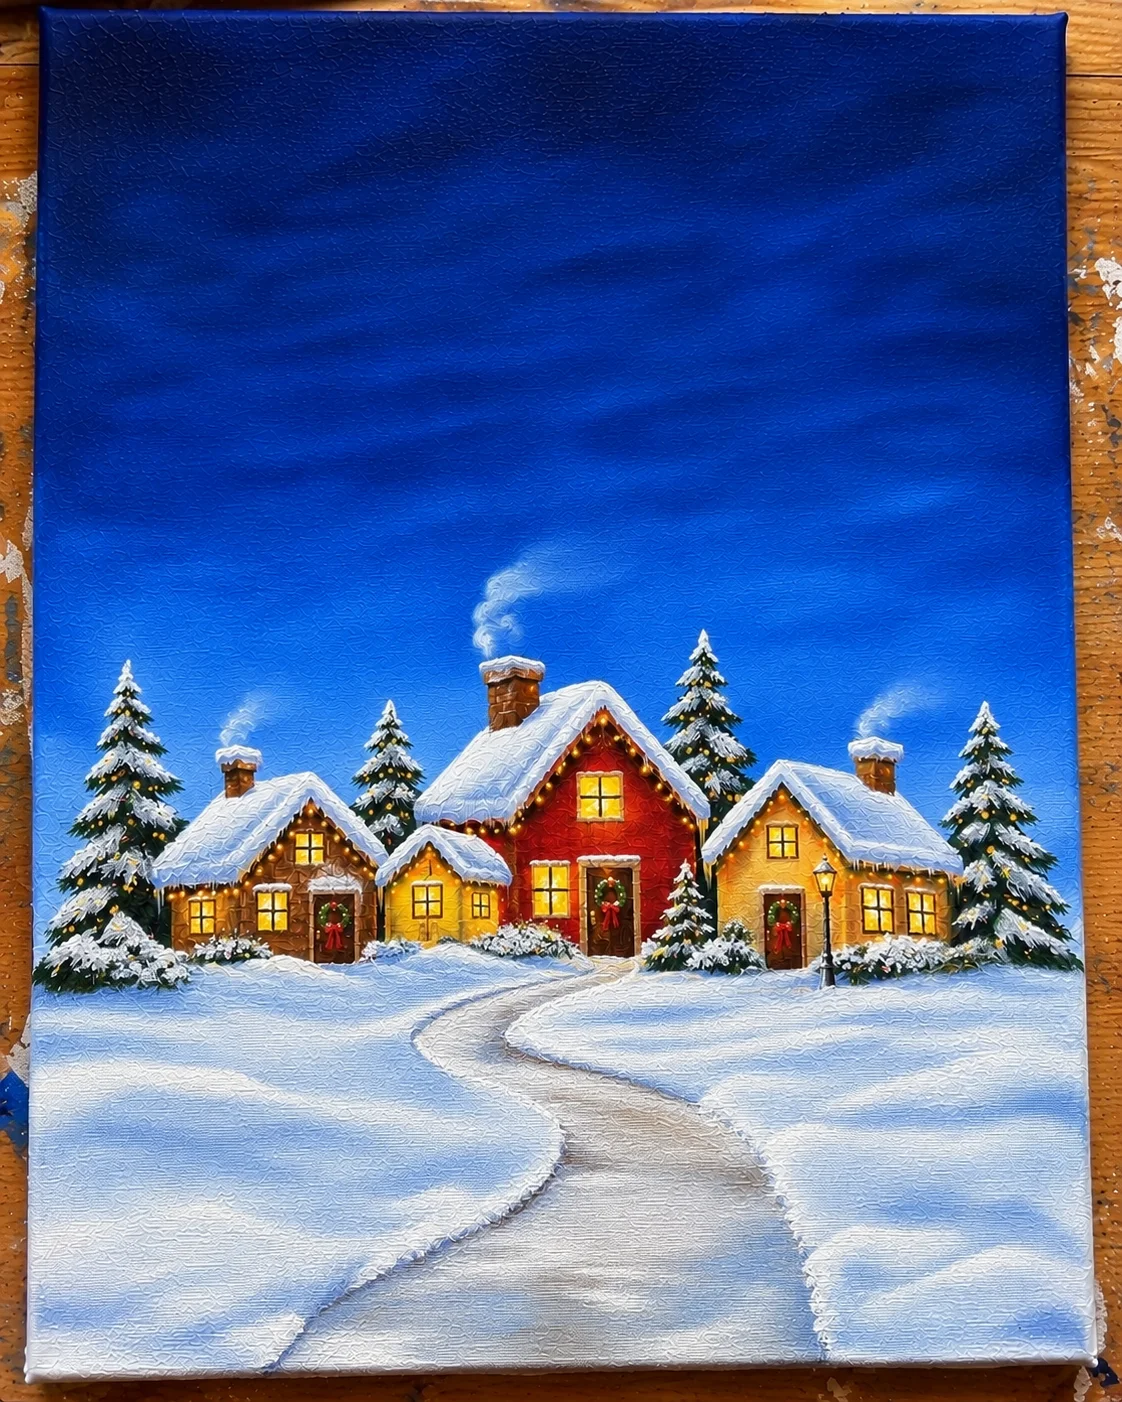
Use titanium white to paint the snowy ground across the lower portion of the canvas. Mix a little blue into the white for areas that need shadows.
Follow the winding path you sketched earlier, leaving its edges slightly irregular. Make the path wider toward the foreground and narrower as it approaches the village to create a sense of distance.
Add short horizontal brushstrokes in pale blue and white to suggest uneven snow. Use brighter white highlights along the edges of the path and around the bases of the trees.
For extra depth, keep the foreground snow slightly darker in a few areas and reserve the brightest white for the closest snowbanks.
Step 8: Add Falling Snow and Final Highlights
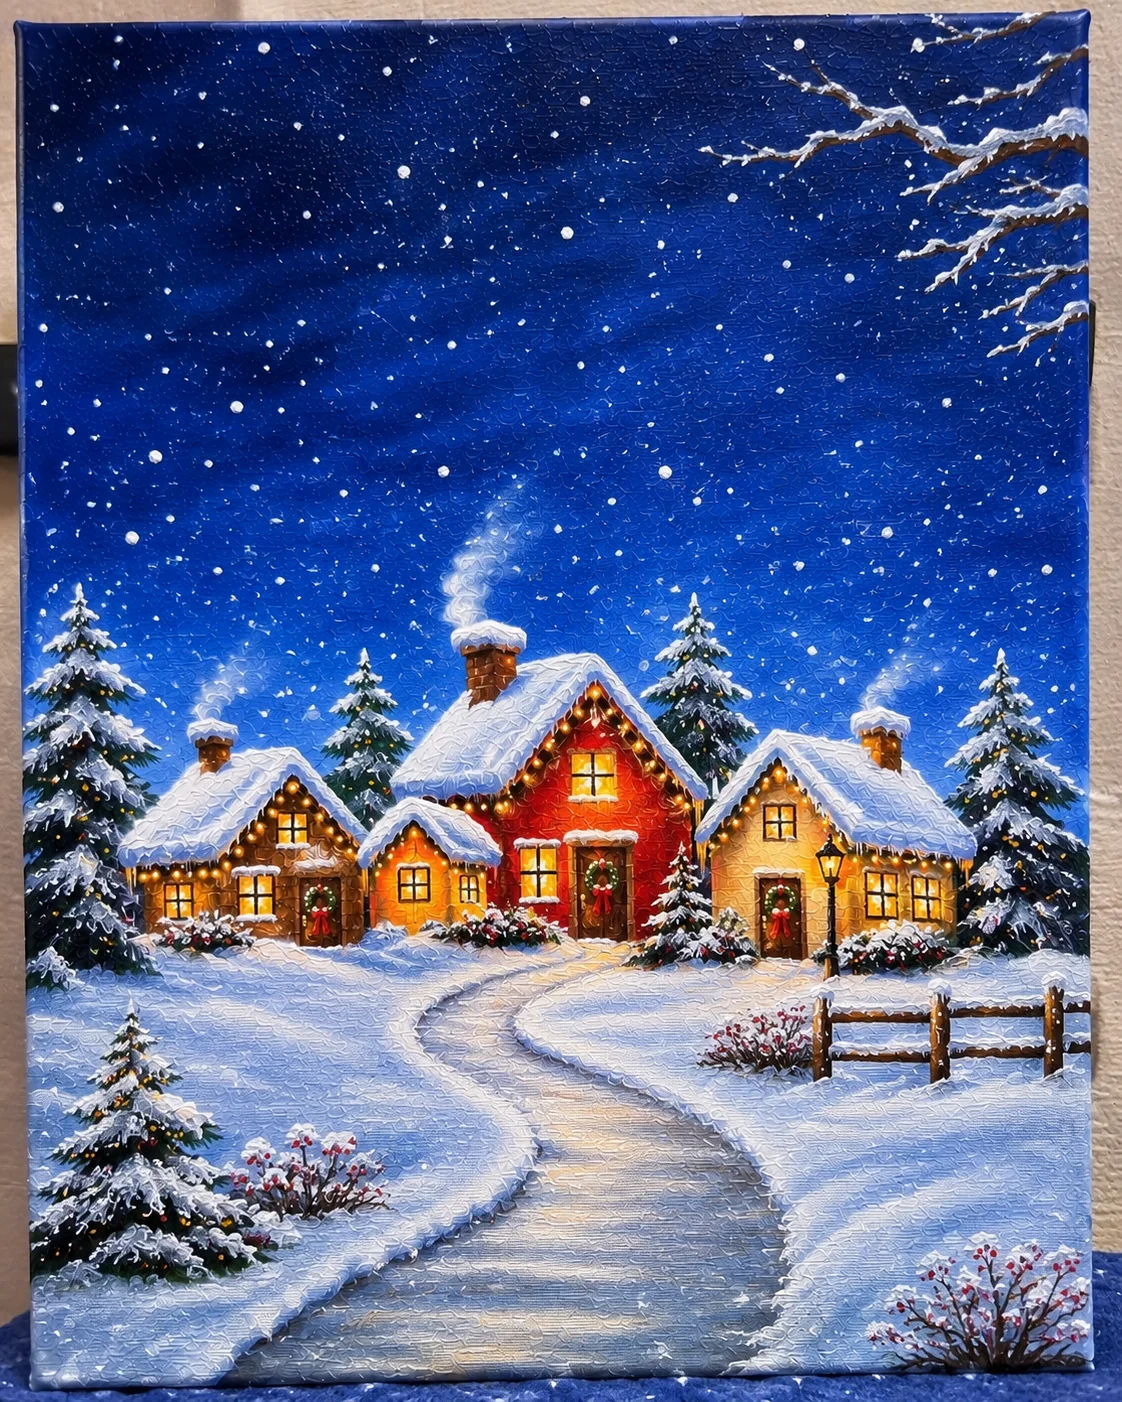
Now bring the entire painting together with falling snow. Dip a small round brush into titanium white and add tiny dots across the sky. Use a few different sizes to make the snowfall look more natural.
Add small white highlights to the tree branches, rooftops, and the edges of the snowy path. You can also use the corner of a flat brush to create tiny snow-covered bushes.
Finally, check the balance of the composition. If one side looks empty, add a small pine tree or a snow-covered fence. If the village looks too crowded, leave some open snowy spaces around the houses.
Allow the finished painting to dry completely before considering a protective acrylic varnish. Follow the varnish manufacturer’s instructions for drying time and application.
How to Make Your Snowy Christmas Village Painting Look More Realistic
You don’t need highly detailed houses or complicated landscape techniques to make a winter village look beautiful. A few thoughtful painting choices can create much more depth and atmosphere.
- Use warm and cool colors together: Combine blue-gray snow and a dark winter sky with golden windows and red cottages.
- Vary the house sizes: Make distant cottages smaller and slightly less detailed than the houses in the foreground.
- Keep the snow irregular: Uneven rooftop edges and natural-looking snowbanks are more interesting than perfectly straight white lines.
- Create overlapping trees: Place some evergreen trees in front of the cottages and others behind them to establish depth.
- Use tiny highlights carefully: A few bright white touches can make rooftops, branches, and windows stand out without covering the entire painting in white.
Common Mistakes When Painting a Snowy Christmas Village
1. Using Only Pure White for Snow
Pure white can make a winter landscape look flat when it’s used everywhere. Mix small amounts of ultramarine blue into white to create shadows beneath rooftops and around snowbanks. Keep pure white for the brightest highlights.
2. Making Every House the Same Size
When all the cottages have identical proportions, the village can look like a row of buildings rather than a natural winter scene. Change their heights, widths, roof angles, and colors to make the composition more interesting.
3. Adding Details Before the Background Dries
Wet acrylic layers can mix together when you paint over them. This can make the cottage edges blurry or cause the colors to become muddy. Allow the underlying layer to dry before adding precise details.
4. Painting Trees Without Individual Branch Shapes
Solid green triangles can make evergreen trees look flat. Start with a central trunk and build the branches using short strokes that extend outward. Finish with small white highlights to suggest snow resting on the branches.
5. Adding Too Much Snowfall
Large white dots covering the entire sky can distract from the houses. Use mostly small dots, with only a few larger flakes. Leave enough open space to keep the village visible.
Easy Variations for Your Christmas Village Canvas Painting
Once you understand the basic composition, you can change the colors, lighting, and landscape to create a completely different Christmas scene.
Snowy Christmas Village at Night
Use a deep navy and ultramarine blue background with bright yellow windows and dark evergreen trees. Add a few tiny white stars and soft snowflakes to create a peaceful nighttime atmosphere.
Pastel Christmas Village
Replace traditional dark colors with pastel pink, lavender, pale blue, and soft mint green. Paint white rooftops and delicate pink trees for a sweet, whimsical holiday design.
Red and White Christmas Cottages
Give each house a different shade of red, from bright cherry to muted burgundy. Combine these colors with white rooftops, dark green trees, and a pale blue sky for a traditional Christmas look.
Christmas Village with a Glowing Street Lamp
Add a black or dark brown street lamp near the snowy path. Paint a small golden light at the top and use pale yellow strokes around it to suggest a warm glow against the cold evening sky.
Christmas Village Under a Starry Sky
Choose a dark blue or blue-purple background and add tiny white stars above the rooftops. A larger golden star over the tallest cottage or Christmas tree can become the focal point of the composition.
How to Protect and Display Your Finished Christmas Painting
After completing your snowy Christmas village, let the acrylic paint dry thoroughly. If you want to protect the finished surface, choose a varnish specifically formulated for acrylic paintings.
Before applying varnish, check the manufacturer’s recommended waiting period. For example, GOLDEN recommends waiting until acrylic paintings are sufficiently dry, with thin layers generally requiring less time than thick applications. Test the varnish on a similar painted surface first.
Choose a matte varnish if you prefer a soft, snowy appearance, or a gloss finish if you want the colors to appear more saturated. Follow the product instructions and allow the protective coating to dry fully before handling or displaying the canvas.
Your finished painting can be displayed on a mantel, shelf, or wall throughout the Christmas season. It can also become a thoughtful handmade holiday gift for someone who loves winter landscapes and festive decorations.
Frequently Asked Questions
What is the easiest way to paint a snowy Christmas village on canvas?
The easiest method is to start with a blue acrylic background, sketch a few simple cottage shapes, and paint the houses using warm colors. Add white rooftops, triangular evergreen trees, glowing yellow windows, and a snowy foreground. Working from large shapes to small details makes the project easier for beginners.
What type of paint is best for a snowy Christmas village painting?
Acrylic paint is a practical choice for this project. It works well on properly prepared canvas, dries relatively quickly, and allows you to layer snow, rooftops, trees, and small decorative details. Titanium white, ultramarine blue, burnt sienna, yellow ochre, red, and dark green provide a useful starting palette.
Can beginners paint a Christmas village on canvas?
Yes! You can create a charming village using basic geometric shapes. Start with rectangular cottage walls, triangular roofs, simple evergreen trees, and small square windows. You don’t need to paint realistic architecture because the snowy landscape and warm Christmas colors help create the festive atmosphere.
How do you make snow look realistic in acrylic painting?
Use a combination of pure white and pale blue rather than covering everything in the same shade. Add blue-gray shadows beneath rooftops, around trees, and along snowbanks. Finish with brighter white highlights on the upper edges of the snow to suggest where the light hits the surface.
How long does it take to paint a snowy Christmas village?
The time depends on the canvas size, number of cottages, and amount of detail. A simple village with a few houses and trees may be completed in one painting session, while a more detailed scene can take several sessions. Allow additional time for the acrylic layers and final protective varnish to dry.
Create Your Own Snowy Christmas Village
A snowy Christmas village painting on canvas is a lovely holiday project that lets you experiment with winter colors, simple cottage shapes, and festive details. Start with a small village, take your time layering the snow, and give each house its own little personality.
Once you’ve finished your first painting, try another version with pastel cottages, a glowing street lamp, or a starry winter sky. Each variation gives you a new way to create a handmade piece of Christmas art for your home.